WordPress Experts Reveal Custom Post Type Secrets with ACF Plugin
When you need to manage several kinds of custom post type on your website, WordPress’s custom post type (CPT) plugin might be a game-changer. WordPress allows you the freedom to create content anyway you see fit, whether you’re creating a noticeboard, portfolio, or any other kind of post type . We’ll show you how to use the Advanced Custom Fields (ACF) plugin, which is now known as SCF (Secure Custom Field), to create and manage Custom Post Types in this post. So let’s talk about How to Use SCF Plugins in WordPress With Example
Video Tutorial
Introduction to Custom Post Types
The standard WordPress post or page kinds can basically be arranged using a custom post type. Custom post types allow you to create additional content structures like “Portfolios,” “Testimonials,” or “Products,” in addition to the built-in post kinds like “Posts” and “Pages” that WordPress offers.

Let’s take the scenario where you require a unique content type for your website’s portfolio section. Rather of use the standard “Post” or “Page,” you can design a unique post type for portfolios, which will simplify the management and presentation of portfolio items.
What You’ll Learn in This Tutorial
In this step-by-step guide, you’ll learn how to:
- Create a custom post type in WordPress using the SCF plugin.
- Add custom fields to your CPT for extra information.
- Design and display the custom post type on a page.
- Display categories separately to organize your content further.
Step 1: Installing SCF Plugin
Before we start creating custom post types, it’s essential to have the SCF plugin installed. SCF stands for Secure Custom Field, a powerful tool for managing custom fields and custom post types in WordPress.
To install the plugin:
- ☞ Go to your WordPress Plugins section.
- ☞ Click Add New and search for SCF (Secure Custom Field).
- ☞ Once you find it, click Install Now and activate the plugin.
With SCF installed, you’re ready to create your custom post types!
Step 2: Creating Your Custom Post Type
Now let’s move on to creating your custom post type (CPT). Follow these steps:
- Go to SCF Settings: From the WordPress dashboard, navigate to SCF > Post Type.
- Click Add Post Type to create a new custom post type.
- Name Your Post Type: Give it a name, like “Portfolio” or “Projects,” and the plugin will automatically generate the slug for your post type.
- Advanced Configuration: Click the Advanced Configuration option to define what supports your custom post type. The default post type supports the Title, Editor, and Feature Image. However, you can check or uncheck these fields based on your needs.
For example, if you don’t need the editor or feature image for your portfolio, simply uncheck those boxes.
Tip: Choosing the Right Menu Icon
You can designate a unique menu symbol to help you identify your custom post type in the WordPress dashboard. You can submit your own icons or select from a variety that SCF gives. How to Use SCF Plugins in WordPress With Example
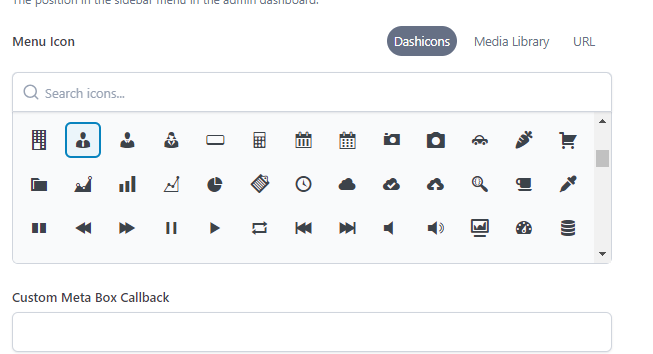
Once you’ve made your selections, click Save Changes, and your custom post type will be ready to use!
Step 3: Adding Custom Fields
Custom fields allow you to add extra information to each of your posts. For a portfolio, you might want to include a Project Name, Portfolio Image, Client Name, or Portfolio Link.
To add custom fields:
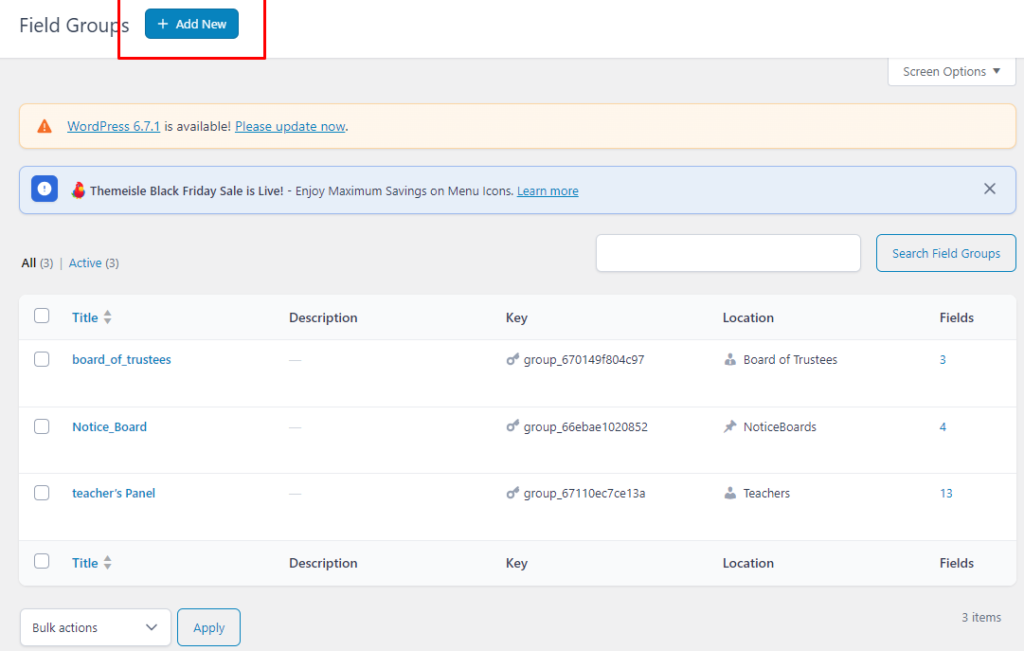
- Go to the Field Group section in SCF and click Add New Field Group.
- Set up the Rule: Choose the custom post type (e.g., Portfolio) where these fields will appear.
- Add the fields you need, such as:
- Text Field for the project name.
- Image Field for the portfolio image.
- URL Field for the portfolio link.
After adding your custom fields, click Save Changes.
You can now go to your Portfolio post type and add new portfolio items, with fields like Project Name and Portfolio Image appearing on each post!
Step 4: Creating a Template for Your Custom Post Type
Now that your custom post type is set up with fields, it’s time to create a template to display it on your site. How to Use SCF Plugins in WordPress With Example
- Go to Templates > Add New Template.
- Choose the Loop Item template, which will help you display the list of portfolio items.
- Add dynamic elements like the Title of the portfolio, the Portfolio Image, and other fields you added (e.g., project name, email, etc.).
To insert dynamic content, use the Dynamic icon feature in SCF to grab data like the post title, image, or email dynamically from the custom fields you created earlier.
Customize Your Layout
You can also customize the layout to display the portfolio items in a grid or a list. Adjust the font size, color, and alignment as needed. For example, you can center the portfolio title, resize the portfolio image, and add a button that links to the project.
Step 5: Displaying the Custom Post Type on a Page
To display your custom post type on a page, follow these steps:
- Create a new page, such as “Portfolios,” and click Edit with Elementor (or your preferred page builder).
- Add the Loop Grid widget to display your portfolio items.
- In the widget settings, choose the Post Type option and select Portfolio.
- Adjust the layout and style to match your design.
Once you’ve finished customizing, click Publish. Now your custom post type is live, displaying your portfolio items in the layout you designed.

Step 6: Organizing Portfolio Categories
If you want to organize your portfolio into different categories (like Web Development, Graphic Design, etc.), you can easily add categories to your posts.
- In the Portfolio post editor, scroll down to the Categories section.
- Add categories like “Web Development” or “Graphic Design.”
- When you go to display the portfolio items, use the Tab Widget to create separate tabs for each category.
For instance, you can create three tabs—Web Development, Graphic Design, and SEO Projects—and display portfolio items related to each category under the respective tab.
Conclusion
Creating a Custom Post Type (CPT) with Advanced Custom Fields (SCF) in WordPress is a powerful way to organize and display different types of content. Whether you’re building a portfolio, a noticeboard, or any other custom content type, SCF provides a straightforward method for managing your content.
By following the steps outlined in this article, you can create custom post types, add relevant fields, and display your content in a way that fits your website’s needs. So, why not get started today?
If you found this article helpful, don’t forget to subscribe to our blog for more WordPress tips and tricks! The end How to Use SCF Plugins in WordPress With Example.